Hello everyone!!
Just a little post to give my best wishes to everyone who reads my blog or follows my on twitter etc,,,
I hope you will have a wonderfull xmas with lots of love an joy and DX.....
For the upcoming year i wish you all the best, have a great new years eve, and watch out with the fireworks!
Hope to see you here soon again, or even better, hear you on the air!
geetings,
Alex PA1SBM and YL
Saturday, December 24, 2011
Monday, November 7, 2011
BITX20 - 5. The VFO build...
Yes indeed the VFO part is done. Especially the small coil with 50 wdg was a blast to make...
Even though i have done a lot of building and fixing stuff, i never wound a coil before. Well there is a first time for everything.
Ok and this is how the VFO part looks when its done.

Next thing is to do some testing again, but i will wait with that till i have some more time to spare... hopefully upcoming weekend. And when i start to test all i just hope everything will be ok so i can proceed to the next part.
Untill the next post !
Sunday, November 6, 2011
BITX20 - 4. Meassuring for the first time....
Ok, First of all, sorry for not being able to post anything any sooner....
My private life has let me to believe that spare time for hobbies is a non existing thing.
although 1 weekend, i must admit, I went on a field day.. it was the last nice weekend, and i went "field-daying" saturday and sunday... i even got sunburned.... But ill write about that later...
Back to business, the BITX20....
I already build the RF amplifier section but i still needed to perform the basic tests for all sections...
First i have to say that the English manual is not bad at all.... but when it came to measuring things, it became a bit lean.... It started to talk about applying voltages etc etc and i had no idea what was meant or what i should do... As later on in the manual you need to do way more complicated tests i decided to keep on fiddeling until i understood what the #$@% they were talking about...
You can imagine that when after 2 hours of reading over and over, looking at schematics, mood ruined, i was really happy to figure out how to do what they meant. Probably the manual is not bad, but as the explanation could have been a bit better for the fist meassurment.
Anyway, i started to perform the first tests....
Multimeter 1.... battery empty.... @#$#$
Multimeter 2.... battery nearly dead which caused wrong readings....
Both replaced, so i am good from now on with betteries... :)
Test lead.... a new one.... busted..... that explaned the 0.00mA ....@#$@#$
Anyway , after fixing all, i finally got all the meassurments correct.... and guess what.... they were good!!! :)
So... on to the next section.... VFO section here i come !!
73's
Thursday, August 18, 2011
Bitx20 - 3. It went BOOM!!
As i said in my last blogpost, i started to build the lineair amplifier alongside.
And the first part you make is a AC to 12v DC switch with an LM317.... pretty basic stuff , but proven technology. I build my power supply with a mil spec one.
Anyway.... the supplied 2200uf capacitors are 50v's ones. The schematic says 25v, but they packed 50v's instead.
This offcourse is not bad as 25 is just enough, so a bit more is only a good thing. BUT! the PCB is drilled for a 25v size, not for a 50v size.
So thy wont fit neatly next to each other.... that kinda made me a bit grumpy.... Especially when i found out that the 1uf next to it was too big on the PCB....
So i started to make it fit as nicely as possible... which i succeeded in, but i kinda forgot the 1uf capacitor.. now at this point i needed to start testing.... so i switched on my power supply and started to measure the voltage coming out of the lm317.... it was not what i expected so i turned off the power supply. A big bang was the next thing that happened and the 2200uf was blown :(
Ohh well... tuff luck i guess and a stoopid mistake on my side... this weekend ill get some new capacitors, and ill continue again....
i'll keep you all posted :)
73's
Alex
Sunday, August 14, 2011
Bitx20 - 2. the build has started.
This morning i finally plugged in the soldering iron, and started to assemble the Bitx......
The first component they said to put in is the min power lead....
So.... the first component.....
 was neatly soldered....

After this first historical moment i turned into high gear.... lol ... not....
But i did finish the band pass filter and the RF-Amplifier...
So it looks like this now...
 With a zoomed in pic....

Not much done yet, but i bumped into te fact i have to insert voltage now and measure some voltages...
That's ofcourse not that difficult , but all my test wires are still in boxes at my parents place....
And as they are old, i am just gonna order some new ones...
As the Linear amplifier assembly can be build parallel to the main PCB , i am going to continue doing that....
The first component they said to put in is the min power lead....
So.... the first component.....


After this first historical moment i turned into high gear.... lol ... not....
But i did finish the band pass filter and the RF-Amplifier...
So it looks like this now...

Not much done yet, but i bumped into te fact i have to insert voltage now and measure some voltages...
That's ofcourse not that difficult , but all my test wires are still in boxes at my parents place....
And as they are old, i am just gonna order some new ones...
As the Linear amplifier assembly can be build parallel to the main PCB , i am going to continue doing that....
Saturday, August 13, 2011
Bitx20 - 1. The unpacking
It took me long enough but due to a busy last couple of weeks i had no time what so ever to spend on my bitx20.... But today things changed for the better.... i finally have time to start looking start up my bitx20 project.
It had arrived about 2 weeks after i bought it, so the shipping takes some time but not too longs...
For the people wondering why he asks for 25 dollars for shipment......
It comes in a cloth bag... with old fashion seals and all... no i am not kidding...
In the bag is a bag , with in there a bag , with in there a few smaller bags , and in them bags with components.....
Ok lets start showing some pics here......
The bag it came in i through away befor i had a photo... here is the bag which came inside of the outer bag...

With in there even more ESD and protection bags....

With in there more bags with components........


Also in the bag the HARDCOPY manuals.... yes... on paper and stuff... not on a cd as pdf or so .... real paper.... excellent!

I was a bit sceptical about the quality i would get from India, but i have to say i was amazed that all this could be put together for the money i paid for it....
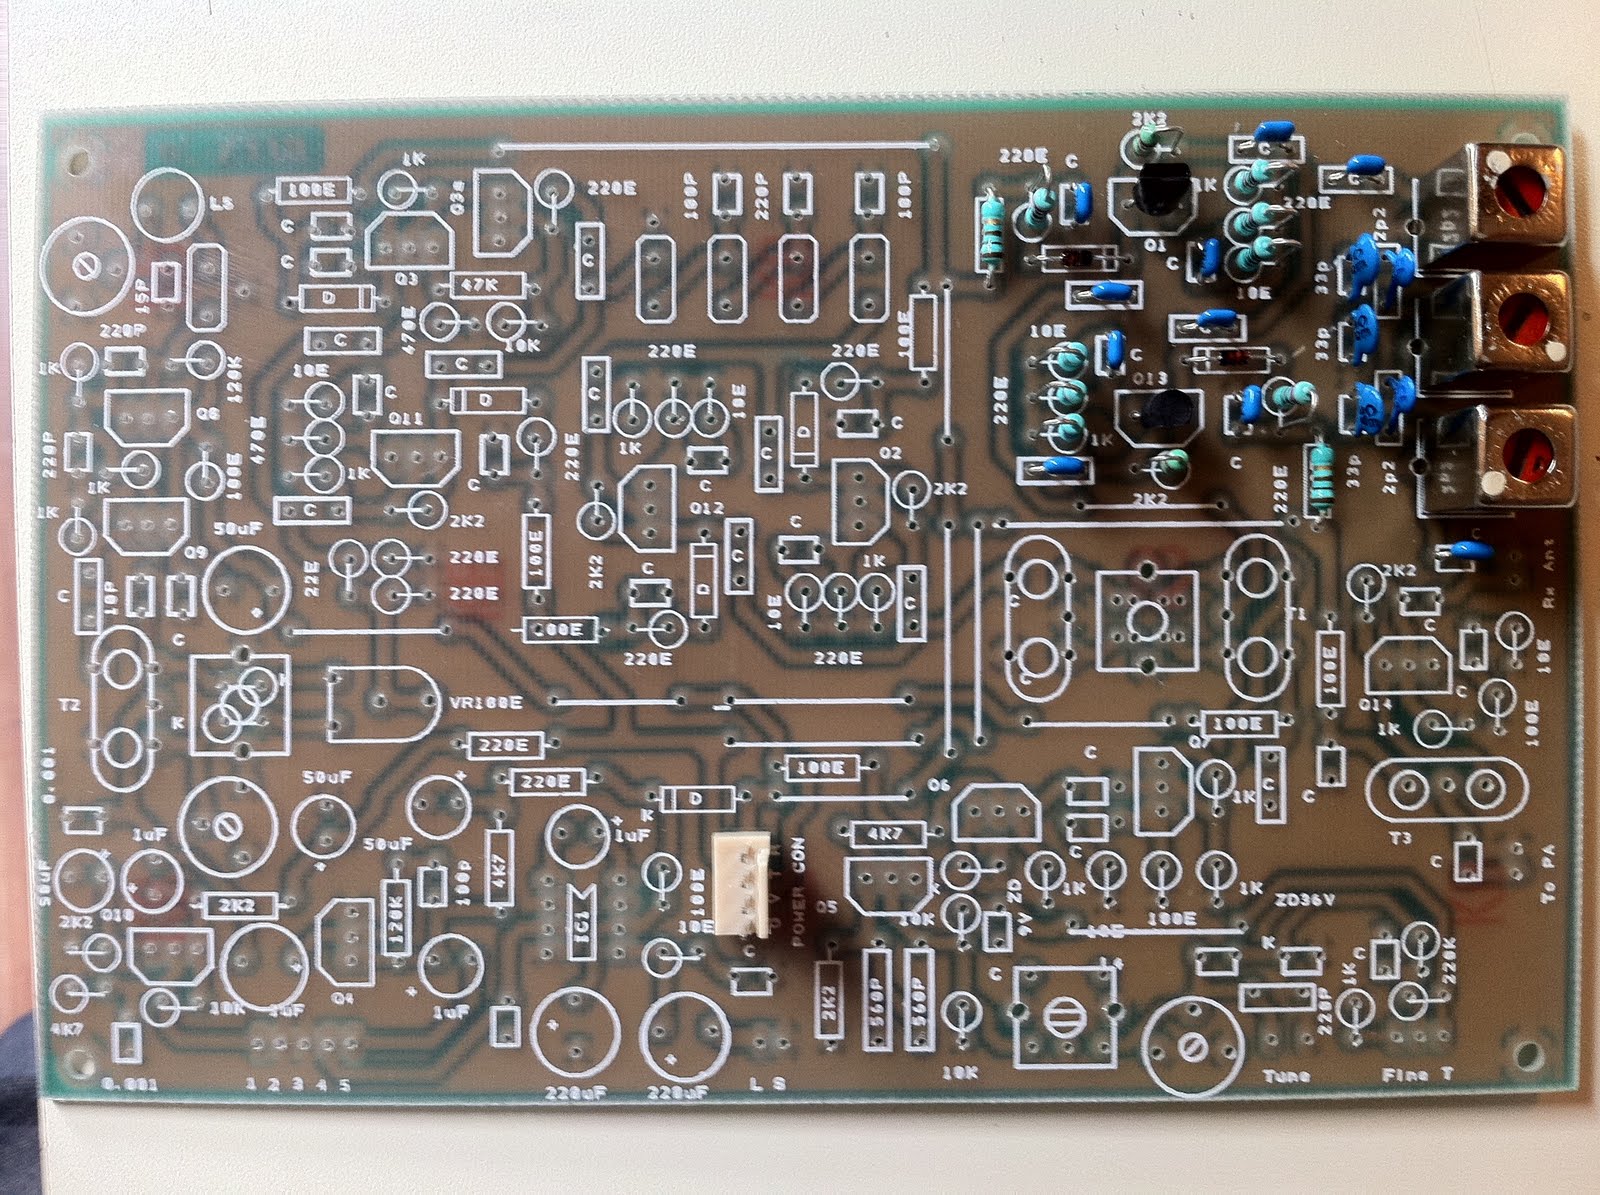
Look at these PCB's...
This is the main pcb (front and back)


And this is the amplifier section PCB


It all looks very very VERY nice..... maybe not the best pcb out there... but the best you can buy for this much money
Tonight i wont start soldering stuff... but tomorrow i will....
Pictures will be made :) no worries....
73's
Alex
It had arrived about 2 weeks after i bought it, so the shipping takes some time but not too longs...
For the people wondering why he asks for 25 dollars for shipment......
It comes in a cloth bag... with old fashion seals and all... no i am not kidding...
In the bag is a bag , with in there a bag , with in there a few smaller bags , and in them bags with components.....
Ok lets start showing some pics here......
The bag it came in i through away befor i had a photo... here is the bag which came inside of the outer bag...

With in there even more ESD and protection bags....

With in there more bags with components........


Also in the bag the HARDCOPY manuals.... yes... on paper and stuff... not on a cd as pdf or so .... real paper.... excellent!

I was a bit sceptical about the quality i would get from India, but i have to say i was amazed that all this could be put together for the money i paid for it....
Look at these PCB's...
This is the main pcb (front and back)


And this is the amplifier section PCB


It all looks very very VERY nice..... maybe not the best pcb out there... but the best you can buy for this much money
Tonight i wont start soldering stuff... but tomorrow i will....
Pictures will be made :) no worries....
73's
Alex
Monday, July 11, 2011
Falcon OUT-250B sort of test results.
Hello all,
I did not realy test the antenna yet, but i can not keep you from the few experiences i had so far with this antenna.
As last friday evening I had some time ti sit behind the set, i scanned most of the bands.
20m was open , and i could hear stations from Brazil, Chille, Peru. This is all between 10.000 and 12.000 km from where i live. They all were very clear.
I did not get the chance to make a QSO with them due to huge pile ups caused by our Italian/Russian/Polisch/etc friends. As they all work with huge beams and at least 1Kw......
But, back from naging to the essence....
As i can swap quickly between antennas due to 2 antenna inputs on my TS-480 i could see and hear the difference very well.....
To be honest, with the falcon i could hear those stations perfectly, and i heard nothing on my wire....
The same story goes for 10m... i heard stations on the falcon where on the wire i just heard QRM.
I hope that upcomming weekend i'll be able to do some real test. If you read my blog and want to help me with tests, please drop me a msg or mail.
73's
Monday, July 4, 2011
New project... Bitx 20
Even though i have limited time, i decided to buy a fun kit to have something to do ... yeah right....
I heard a few fellow amateurs talk about a qrp tranceiver called a bitx .... as i had no idea what they were talking about i joined their conversation. They talled me about this little qrp set designed with off the shelf components, and and VERY cheap.
So that night i started to do some research on this set..... and after a few days thinking about it i ordered the most expensive set.... yes... the MOST expensive set. Now get this ... the most expensive set.... is ... hold on.... $75... yes you read it correctly 75 dollars.
Now, i am not going to tell all about it here as there is way enough info on the net...
This is the main site. Ashhar Farhan VU2ESE
And this is the ebay site where i bought it ... Ebay store
If you want a cheaper version.... thats possible....the cheapest kit is ... and again i am not kidding you, check it out yourself.... a whole 30 us dollars......
Well... i got an email saying the kit was send on saturday the second of july.... so i will just have to wait :)
I will keep you guys posted
Alex
Sunday, July 3, 2011
Falcon OUT-250B the ultimate 20m vertical ?
I promised i would post some test results about the the Falcon OUT-250B i got recently.
And finally i got some spare time to use the set again last night and today.
Now befor you read on, i only have a wire in my backyard to compare it to. it's a Wimo balun (i think a 1:9) with about 15m wire attached. This is the one: Wimo MTFT antenna
As i really like the 20 meter band, I will start my test there.....
And the first thing i noticed.... no signal ? is the antenna broken? No its not!
On 20 meters this antenna is QUIET!....
The signals might be a bit lower then compared to my wire antenna (about .5 to 1 S point) but it does not have a S3 to S5 noise level with it.... I have no idea what you would want, but i prefer to listen to a S5 clean signal then to a S7 with noise in it.
Now, the 20 meter band is also where this antenna switches from good to bad... well bad....
If you expect to work 40M, 80M well on this antenna i have to dissapoint you.
Experience teaches us that all above 20 meters, you are better off with a wire...
So also with this antenna, it works, but do not expect miracles.
This was confirmed as well when i was listening on the 40m and 80m bands. As soon as i switched to my wire, the signal level went up as well the clarity of the signal.
On the other hand, 17m,15m,12m,10m and 6m all work above my expatiation i had of this antenna.
I do have to say i did not work on those bands yet, but i did listen to other amateurs there.
Anyway, that's my point of view on this antenna.
If you do not have a lot of space to put multiple antennas up like wire's and beams and verticals etc, and you are stuck with just being able to put op a vertical, then this antenna is really not a bad choice.
Is it the best? i dont know. Is it the worst? for sure not.
Also the 'lack" of radials is awesome when you have lack of space.
Anyway, if you have any questions, do not hesitate to send me a mail or something....
Monday, June 13, 2011
Preparations to put up the Diamond KV-5, a 5 band antenna - PART 3
The fun installation turned out be a complete nightmare.....
The KV-5 was set up at ground level... and it worked really REALLY well.... The SWR was absolutely perfect. So it was time to put the KV-5 on top of my mast in the back yard.
There it is :)
 I was so happy..... But that changed rapidly....
I hooked up the antenna to my ts-480 and tried to tune it.... but.... NO band would tune....
The 5 bands were perfectly set up , but now high above the ground it was totally messed up!
Not having a clue what i did wrong, i wrote an email to Diamond in Japan....
And their answer was pretty clear... "KV5 is required to install at the ground."
I wrote a reply stating my frustration that the manual is not clear at all on the location to install the antenna. There is no note at all that you can not install this antenna on a mast. nor is there a note that you can only install this antenna at ground level.
I called my supplier and he and I came to an agreement that he would take back the KV-5 and supply me with a Falcon OUT-250B , a many band 7,16m long GPA. (google for exact specs....)
So now we have........

I have not had the time to test it really well.... but it tunes on all bands, and it receives more then my weird wire antenna.....
In the upcoming weeks i will see how it works and compares to other antenna's......
73's
The KV-5 was set up at ground level... and it worked really REALLY well.... The SWR was absolutely perfect. So it was time to put the KV-5 on top of my mast in the back yard.
There it is :)

I hooked up the antenna to my ts-480 and tried to tune it.... but.... NO band would tune....
The 5 bands were perfectly set up , but now high above the ground it was totally messed up!
Not having a clue what i did wrong, i wrote an email to Diamond in Japan....
And their answer was pretty clear... "KV5 is required to install at the ground."
I wrote a reply stating my frustration that the manual is not clear at all on the location to install the antenna. There is no note at all that you can not install this antenna on a mast. nor is there a note that you can only install this antenna at ground level.
I called my supplier and he and I came to an agreement that he would take back the KV-5 and supply me with a Falcon OUT-250B , a many band 7,16m long GPA. (google for exact specs....)
So now we have........

I have not had the time to test it really well.... but it tunes on all bands, and it receives more then my weird wire antenna.....
In the upcoming weeks i will see how it works and compares to other antenna's......
73's
Friday, June 3, 2011
The Papers arrived !!!! YEAY !!!
Today my license papers finally arrived. so i am now officially a full licensed ham amateur....
I have been using my new call for the last few days already, i don't really know if i could, but my old call was revoked on the site already, my new call was there, and even QRZ was already automatically updated.
I will scan the license later to put it up here.... Can't help being proud of myself that i managed to motivate me to get my Full license after having my Novice license for about 16 years already.
Alex
Thursday, June 2, 2011
Preparations to put up the Diamond KV-5, a 5 band antenna - PART 2
Even though it was really hot outside in the sun , i did some more preperations for putting up the antenna.
I did not make any photo's yet, so I'll add them later.
I started out with a nice trip to the local DIY supply store called Gamma.
I needed some copper pipes, 2 2m pipes, Special ground wire (5 mm wire used in electrical installation)
And some other small parts....
I started with putting the copper pip into the ground... Using water as "drill" you can push 4 meters of copper pipe into the ground EASY.... Don't go deeper with the copper pipe then needed. Copper pipe no goes for 11 euro for a small 2 meter pipe which is the smallest pipe (12 mm).
when that was done i connected the ground wire to the lower wall bracket.
Of course the wire runs through a grey PVC pipe.
When that was done I started to prepare my 6meter long mast pipe. I wanted a possibility to hose a wire antenna to the top, so I made a rope installation.
Tomorrow probably will be the final day of installing the antenna... finally.... but it is said to be really hot again.... If its too hot then i will wait till Sunday where it will be a bit less hot.
Photos will follow later.
Sunday, May 29, 2011
Preparations to put up the Diamond KV-5, a 5 band antenna - PART 1
As where i live i do not have a lot of room, i really can only put up a vertical.
So after some research in what is around, and what is "easily" obtained in Holland, i ended up with a Diamond KV-5 a 5 band antenna for 3.5/7/14/21/28 Mhz (80m/40m/20m/15m/10m)
Yesterday i went to Beesterzwaag for a radio fair and bought my antenna......
This morning i started putting the all barckets....
 and after that i started to put together the antenna...

We did need some equipment to get the SWR within reasonable value's.....
 The MFJ analyzer was just packed again ......
As the wind is quite firm , and the cable and pipe are not prepared yet, the story will continue later or tomorrow or so :) i am not in a rush.....
So after some research in what is around, and what is "easily" obtained in Holland, i ended up with a Diamond KV-5 a 5 band antenna for 3.5/7/14/21/28 Mhz (80m/40m/20m/15m/10m)
Yesterday i went to Beesterzwaag for a radio fair and bought my antenna......
This morning i started putting the all barckets....


We did need some equipment to get the SWR within reasonable value's.....

As the wind is quite firm , and the cable and pipe are not prepared yet, the story will continue later or tomorrow or so :) i am not in a rush.....
Wednesday, May 25, 2011
Finaly a full license...
Today i got the results of my exam in Rotterdam....
As i had counted all my wrong answers, which let up to 16 wrong answers, i knew i had failed the test for the second time.
I opened the envelope and started reading what i thought was the letter telling me to hit the books again and go do the exam again in Eindhoven....
I started reading....."we like to congratulate you..." well thats a bit weird to say to someone who failed....
"35 correct answers"..... I started to realize that one of my answers which were wrong had been corrected and i ended up with just enough to pass the exam....
I can tell you .... i have been in a good mood since :)
Thursday, May 12, 2011
ZS6BKW....
As i wanted to make myself a dipole antenna for field-days, i started to ask around and look on websites. I found a nice website after a chat with a fellow amateur who told me about the zs6bkw antenna. This is the link. http://faberg.home.xs4all.nl/g5rv/g5rv.htm
I am not going to explane all about this antenna, cause it is explaned on that page very well....
If you can't read dutch, or the Google translator is not working that well, drop me a note and i can help out.
I did a really quick field day.... lets call it an field-hour instead to check out if it worked.
And i can tell you, its quiet... no noise at all and the antenna worked promising enough....
I made a quick QSO with a station 3600 km away.... the first try :)
As you can make 2 versions of this antenna, 1 with 300 Ohm ladder line and one with 450.
I made the one with 300 Ohm line.... Why? well.. i thought about it for a while and the actual dipole which you send and receive with is just a bit longer.... my guess.. more line on the dipole might end up with better reception.... But i did not do any calculations on this.... its based on a gut feeling, so no garanties what so ever.
So the measurements are for my ZS6BKW:
Length of the dipole: 2 times 14.05 mtr
Length of the 300 Ohm ladder line: 11.20 meters

I made my own center part as nothing in the shop was what i wanted. i wanted to have my wires to be centered in side of my center part.

On the website you can read that is advisable to feed the ladder line into a choke balun. I did this as well. Choke baluns are easy to make. This is mine....


And when it is all set up , it looks kinda like this....

73's
Alex
Subscribe to:
Posts (Atom)